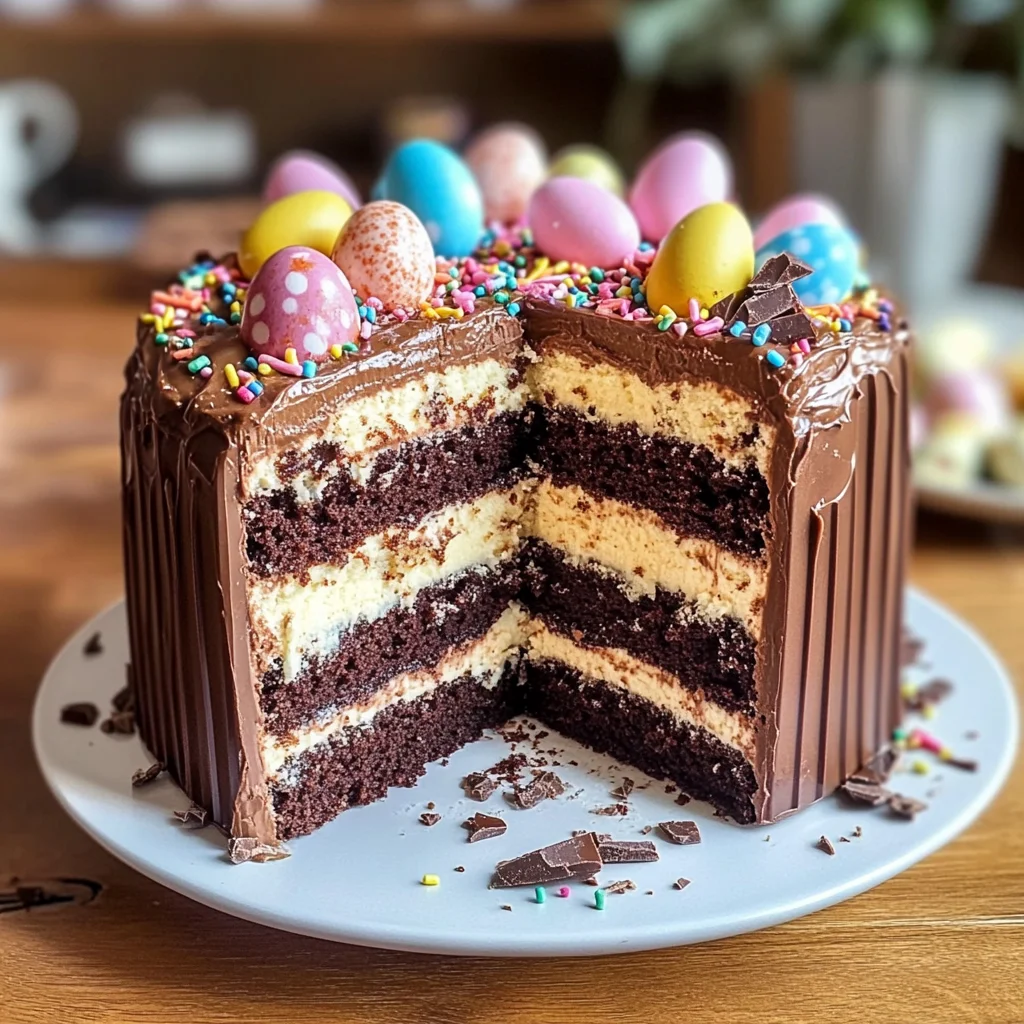
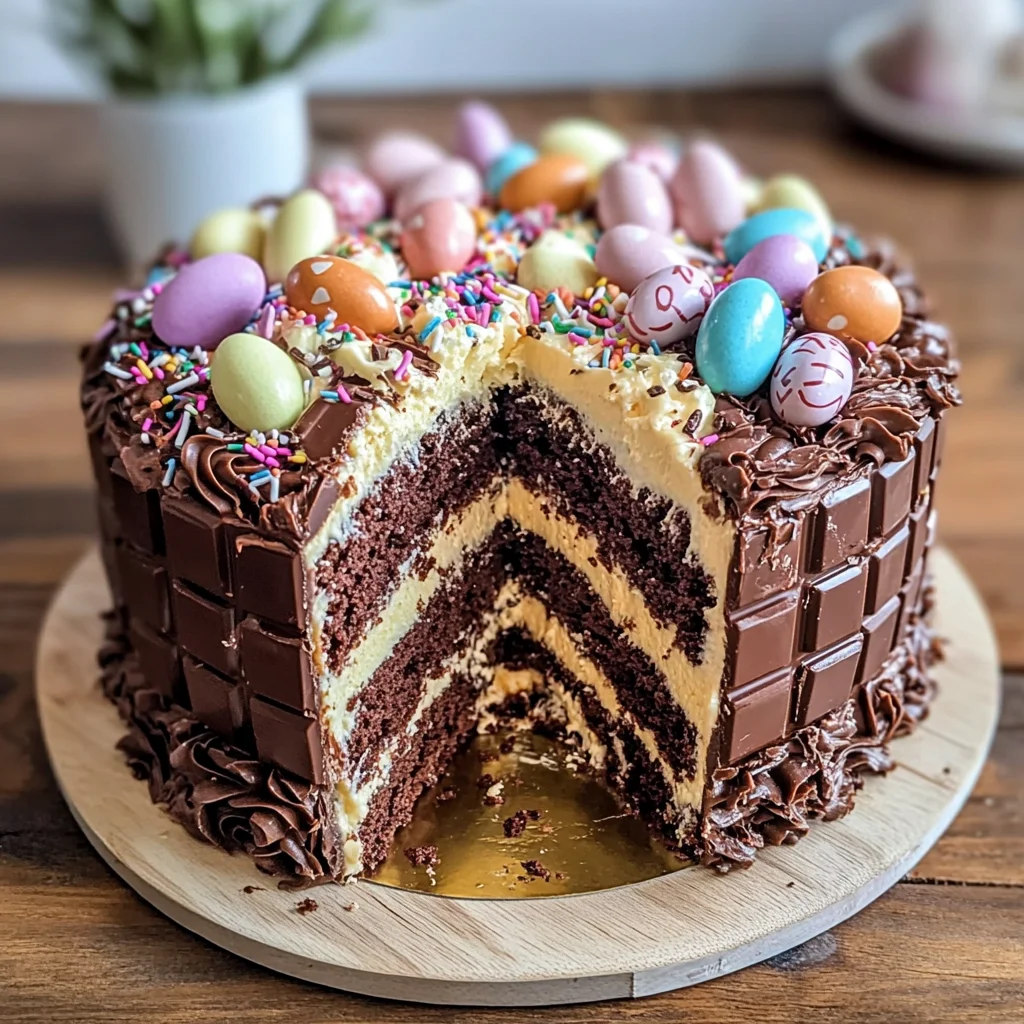
If you’re looking for a show-stopping dessert that will make your Easter celebrations even sweeter, this Easter KitKat Cake with Cadbury Cream Egg Filling is just what you need! This cake is more than just a treat; it’s a delightful experience filled with rich chocolatey layers and crunchy KitKat goodness. It’s perfect for family gatherings, birthday parties, or just because you deserve something special.
What makes this cake truly memorable is its combination of textures and flavors. The moist chocolate cake layered with silky ganache and topped with colorful mini eggs creates a festive centerpiece that everyone will adore. Plus, it’s surprisingly easy to whip up, making it a go-to recipe for busy days.
Why You’ll Love This Recipe
- Easy to prepare: With simple steps and straightforward ingredients, you can make this cake without any fuss.
- Family-friendly appeal: Kids and adults alike will love the combination of chocolate cake and crunchy KitKats.
- Make-ahead convenience: You can bake the cake in advance and assemble it later, saving time on the big day.
- Visually stunning: With its vibrant toppings and layered design, this cake looks as good as it tastes!
- Indulgent flavor: Every slice is packed with rich chocolate flavor, satisfying your sweet tooth.
Ingredients You’ll Need
Gathering the ingredients for this Easter KitKat Cake is part of the fun! You’ll find that these are simple, wholesome ingredients you likely already have in your pantry. Get ready to create something delicious!
For the Cake
- 2 ½ cups (315g) all-purpose flour
- 2 ½ tsp baking powder
- ½ tsp salt
- 1 cup (230g) unsalted butter, softened
- 2 cups (400g) granulated sugar
- 4 large eggs
- 1 tbsp vanilla extract
- 1 cup (240ml) whole milk
- ½ cup (120ml) sour cream
- ½ cup (45g) cocoa powder
For the Ganache
- 1 cup (160g) semi-sweet chocolate chips
- 1 cup (240ml) heavy cream
- 1 tbsp corn syrup
- 1 tbsp unsalted butter
For the Toppings
- 12 KitKat bars (full-size)
- 1 ½ cups (180g) mini chocolate eggs
- ½ cup (80g) colorful sprinkles
Variations
This recipe is wonderfully flexible! Here are some fun ideas to customize your Easter KitKat Cake:
- Add different candies: Swap out mini chocolate eggs for other festive candies like jelly beans or caramel-filled chocolates.
- Use flavored extracts: Mix things up by using almond or mint extract instead of vanilla for a unique twist.
- Try different frostings: Instead of ganache, you could use cream cheese frosting or whipped topping for a lighter option.
- Make it gluten-free: Substitute all-purpose flour with a gluten-free blend to accommodate dietary needs.
How to Make Easter KitKat Cake with Cadbury Cream Egg Filling
Step 1: Prepare the Cake
Preheat your oven to 350°F (175°C). Greasing and lining two 9-inch round cake pans ensures your cakes come out perfectly shaped without sticking. In a bowl, sift together the flour, baking powder, cocoa powder, and salt; this helps to aerate the dry ingredients for a lighter cake.
In another large mixing bowl, beat the softened butter and granulated sugar until it’s light and fluffy—this step adds air into the batter for a lovely rise. Add in the eggs one at a time, mixing well after each addition. Stir in the vanilla extract for that warm flavor. Now mix in half of your dry ingredients before adding in the milk and sour cream; finish by adding the remaining dry mix until everything comes together smoothly.
Step 2: Bake the Cake
Divide your batter evenly between the two prepared pans. It’s essential to bake them until they’re just set—about 30-35 minutes—so keep an eye on them! A toothpick inserted into the center should come out clean when they’re done. After baking, let them cool in their pans for about 10 minutes before transferring them to a wire rack to cool completely.
Step 3: Make the Chocolate Ganache
In a small saucepan over medium heat, combine heavy cream and corn syrup until simmering; this helps dissolve any solids while creating that silky texture we love in ganache. Once heated through, pour it over your chocolate chips and unsalted butter in a bowl. Let it sit for about two minutes before whisking until smooth—this patient step ensures no lumps remain!
Step 4: Assemble the Cake
Start by placing one layer of cooled cake on your serving plate. Spread an even layer of ganache on top—it’s going to be delicious! Place your second layer on top, then cover the entire cake with any remaining ganache.
Now comes my favorite part! Break each KitKat bar into individual fingers and press them around the sides of your beautifully frosted cake. Finish off by decorating the top with mini chocolate eggs and colorful sprinkles; this will add both charm and crunch!
Step 5: Chill and Serve
Finally, refrigerate your masterpiece for at least an hour before slicing—this allows those decadent layers of ganache to set perfectly. Once chilled, slice into generous pieces and enjoy every delightful bite of this indulgent Easter treat!
Pro Tips for Making Easter KitKat Cake with Cadbury Cream Egg Filling
Creating the perfect Easter KitKat Cake is easier than you think! Here are some handy tips to ensure your cake turns out beautifully.
-
Use room temperature ingredients: Bringing your eggs, butter, and milk to room temperature allows them to blend more easily, resulting in a smoother batter and a fluffier cake.
-
Sift dry ingredients: Sifting flour, cocoa powder, and baking powder removes lumps and aerates the mixture. This leads to a lighter cake texture that is oh-so-delicious!
-
Don’t skip cooling time: Allowing your cakes to cool completely before frosting prevents the ganache from melting. A well-set ganache creates a stunning finish and makes slicing much easier.
-
Press KitKats firmly: When placing the KitKats around the cake, press them in gently but firmly. This helps them stick better and gives your cake that impressive, finished look.
-
Chill before serving: Refrigerating the assembled cake for at least an hour helps the layers meld together and allows the ganache to firm up nicely, making for cleaner slices and a delightful bite.
How to Serve Easter KitKat Cake with Cadbury Cream Egg Filling
Presentation can elevate any dessert experience! Here are some fun ideas for serving your Easter KitKat Cake that will impress your guests.
Garnishes
-
Fresh berries: Adding raspberries or strawberries on top not only adds color but also introduces a refreshing tartness that balances the sweetness of the cake.
-
Whipped cream: A dollop of lightly sweetened whipped cream on the side makes for a delightful pairing that enhances every bite of chocolatey goodness.
-
Mint leaves: A few fresh mint leaves can add a touch of elegance while providing a refreshing contrast to the rich flavors of the cake.
Side Dishes
-
Vanilla Ice Cream: The creamy texture of vanilla ice cream perfectly complements the rich chocolate flavor of the cake, creating a delicious contrast that delights your palate.
-
Fruit Salad: A light fruit salad made with seasonal fruits adds freshness and brightness, cutting through the richness of the cake while enhancing its festive appeal.
-
Chocolate-Covered Strawberries: These indulgent treats are not only visually appealing but also offer an extra layer of chocolate bliss that pairs wonderfully with your KitKat cake.
-
Coffee or Tea: A warm cup of coffee or tea provides a comforting finish to your meal. The slight bitterness from coffee can balance out the sweetness of dessert beautifully.
Enjoy every moment as you indulge in this scrumptious Easter treat! Happy baking!
Make Ahead and Storage
This Easter KitKat Cake with Cadbury Cream Egg Filling is perfect for meal prep! Whether you’re planning for a festive gathering or simply want to enjoy a sweet treat throughout the week, this cake stores beautifully.
Storing Leftovers
- Store leftover cake in an airtight container at room temperature for up to 3 days.
- For longer freshness, refrigerate the cake, where it will last up to a week.
- If you have leftover ganache, store it separately in the fridge and reheat before serving.
Freezing
- To freeze, wrap individual slices tightly in plastic wrap and then place them in a freezer-safe bag.
- The cake can be frozen for up to 2 months.
- Thaw in the refrigerator overnight before enjoying.
Reheating
- To enjoy your cake warm, microwave individual slices for 10-15 seconds.
- If you prefer it cold, simply serve it straight from the fridge after thawing.
FAQs
Have questions about this delightful Easter treat? Here are some frequently asked ones!
Can I make the Easter KitKat Cake with Cadbury Cream Egg Filling ahead of time?
Absolutely! You can bake and assemble your cake a day in advance. Just store it in the refrigerator overnight to keep it fresh.
What can I use instead of heavy cream for the ganache in the Easter KitKat Cake with Cadbury Cream Egg Filling?
You can substitute heavy cream with coconut cream or a non-dairy alternative like almond milk mixed with cornstarch for added thickness.
How long does the Easter KitKat Cake with Cadbury Cream Egg Filling last?
When stored properly, this cake will remain delicious at room temperature for up to 3 days or refrigerated for up to a week.
Final Thoughts
I hope you’re as excited as I am about making this Easter KitKat Cake with Cadbury Cream Egg Filling! It’s a fun, festive dessert that’s sure to bring smiles to everyone who tries it. Enjoy every moment of baking and sharing this delightful creation. Happy baking and happy Easter!
Easter KitKat Cake with Cadbury Cream Egg Filling
Indulge in the delightful experience of our Easter KitKat Cake with Cadbury Cream Egg Filling! This decadent dessert features layers of moist chocolate cake, rich chocolate ganache, and crunchy KitKat bars, topped with colorful mini eggs for a festive touch. Perfect for family gatherings or any celebration, this cake will surely impress both kids and adults alike. Easy to prepare and visually stunning, it’s the ultimate sweet treat that makes every occasion special.
- Prep Time: 20 minutes
- Cook Time: 35 minutes
- Total Time: 55 minutes
- Yield: Serves approximately 12 slices 1x
- Category: Dessert
- Method: Baking
- Cuisine: American
Ingredients
- 2 ½ cups all-purpose flour
- 2 ½ tsp baking powder
- ½ tsp salt
- 1 cup unsalted butter, softened
- 2 cups granulated sugar
- 4 large eggs
- 1 tbsp vanilla extract
- 1 cup whole milk
- ½ cup sour cream
- ½ cup cocoa powder
- 1 cup semi-sweet chocolate chips
- 1 cup heavy cream
- 1 tbsp corn syrup
- 12 KitKat bars
- 1 ½ cups mini chocolate eggs
- ½ cup colorful sprinkles
Instructions
- Preheat oven to 350°F (175°C). Grease and line two 9-inch round cake pans.
- In a bowl, sift together flour, baking powder, cocoa powder, and salt.
- In another large mixing bowl, beat the softened butter and granulated sugar until light and fluffy. Add the eggs one at a time, mixing well after each addition. Stir in the vanilla extract. Mix in half of the dry ingredients before adding in the milk and sour cream; finish by adding the remaining dry mix until everything comes together smoothly.
- Divide the batter evenly between the two prepared pans. Bake for 30-35 minutes or until a toothpick inserted into the center comes out clean. Allow to cool in the pans for about 10 minutes before transferring to a wire rack to cool completely.
- For the ganache, heat the heavy cream and corn syrup until simmering; pour it over the chocolate chips and unsalted butter in a bowl. Let it sit for about two minutes before whisking until smooth.
- Start by placing one layer of cooled cake on your serving plate. Spread an even layer of ganache on top, then place the second layer on top. Cover the entire cake with remaining ganache.
- Break each KitKat bar into individual fingers and press them around the sides of the frosted cake. Decorate the top with mini chocolate eggs and colorful sprinkles.
- Refrigerate the assembled cake for at least an hour before slicing.
Nutrition
- Serving Size: 1 slice (100g)
- Calories: 420
- Sugar: 38g
- Sodium: 250mg
- Fat: 24g
- Saturated Fat: 14g
- Unsaturated Fat: 8g
- Trans Fat: 0g
- Carbohydrates: 47g
- Fiber: 2g
- Protein: 6g
- Cholesterol: 85mg

Leave a Comment